
Using the Noise Gate
In most situations, setting the Reduction slider to the lowest possible value ensures that
sounds below the Threshold value are completely suppressed. Setting Reduction to a
higher value attenuates low-level sounds but still allows them to pass. You can also use
Reduction to boost the signal by up to 20 dB, which is useful for ducking effects.
The Attack, Hold, and Release knobs modify the dynamic response of the Noise Gate. If
you want the gate to open extremely quickly, for percussive signals such as drums, set
the Attack knob to a lower value. For sounds with a slow attack phase, such as string
pads, set Attack to a higher value. Similarly, when working with signals that fade out
gradually or that have longer reverb tails, set a higher Release knob value that allows the
signal to fade out naturally.
The Hold knob determines the minimum amount of time that the gate stays open. You
can use the Hold knob to prevent abrupt level changes—known as chattering—caused
by rapid opening or closing of the gate.
The Hysteresis slider provides another option for preventing chattering, without needing
to define a minimum Hold time. Use it to set the range between the threshold values
that open and close the Noise Gate. This is useful when the signal level hovers around
the Threshold level, causing the Noise Gate to switch on and off repeatedly, producing
the undesirable chattering effect. The Hysteresis slider essentially sets the Noise Gate to
open at the Threshold level and remain open until the level drops below another, lower,
level. As long as the difference between these two values is large enough to accommodate
the fluctuating level of the incoming signal, the Noise Gate can function without creating
chatter. This value is always negative. Generally, −6 dB is a good place to start.
In some situations, you may find that the level of the signal you want to keep and the
level of the noise signal are close, making it difficult to separate them. For example, when
you are recording a drum kit and using the Noise Gate to isolate the sound of the snare
drum, the hi-hat may also open the gate in many cases. To remedy this, use the side-chain
controls to isolate the desired trigger signal with the High Cut and Low Cut filters.
Important:
The side-chain signal is used only as a detector/trigger in this situation. The
filters are used to isolate particular trigger signals in the side-chain source, but they have
no influence on the actual gated signal—the audio being routed through the Noise Gate.
To use the side-chain filters
1
Click the Monitor button to hear how the High Cut and Low Cut filters will affect the
incoming trigger signal.
2
Drag the High Cut slider to set the upper frequency. Trigger signals above this are filtered.
3
Drag the Low Cut slider to set the lower frequency. Trigger signals below this are filtered.
80
Chapter 4
Levels Effects
The filters allow only very high (loud) signal peaks to pass. In the drum kit example, you
could remove the hi-hat signal, which is higher in frequency, with the High Cut filter and
allow the snare signal to pass. Turn monitoring off to set a suitable Threshold level more
easily.
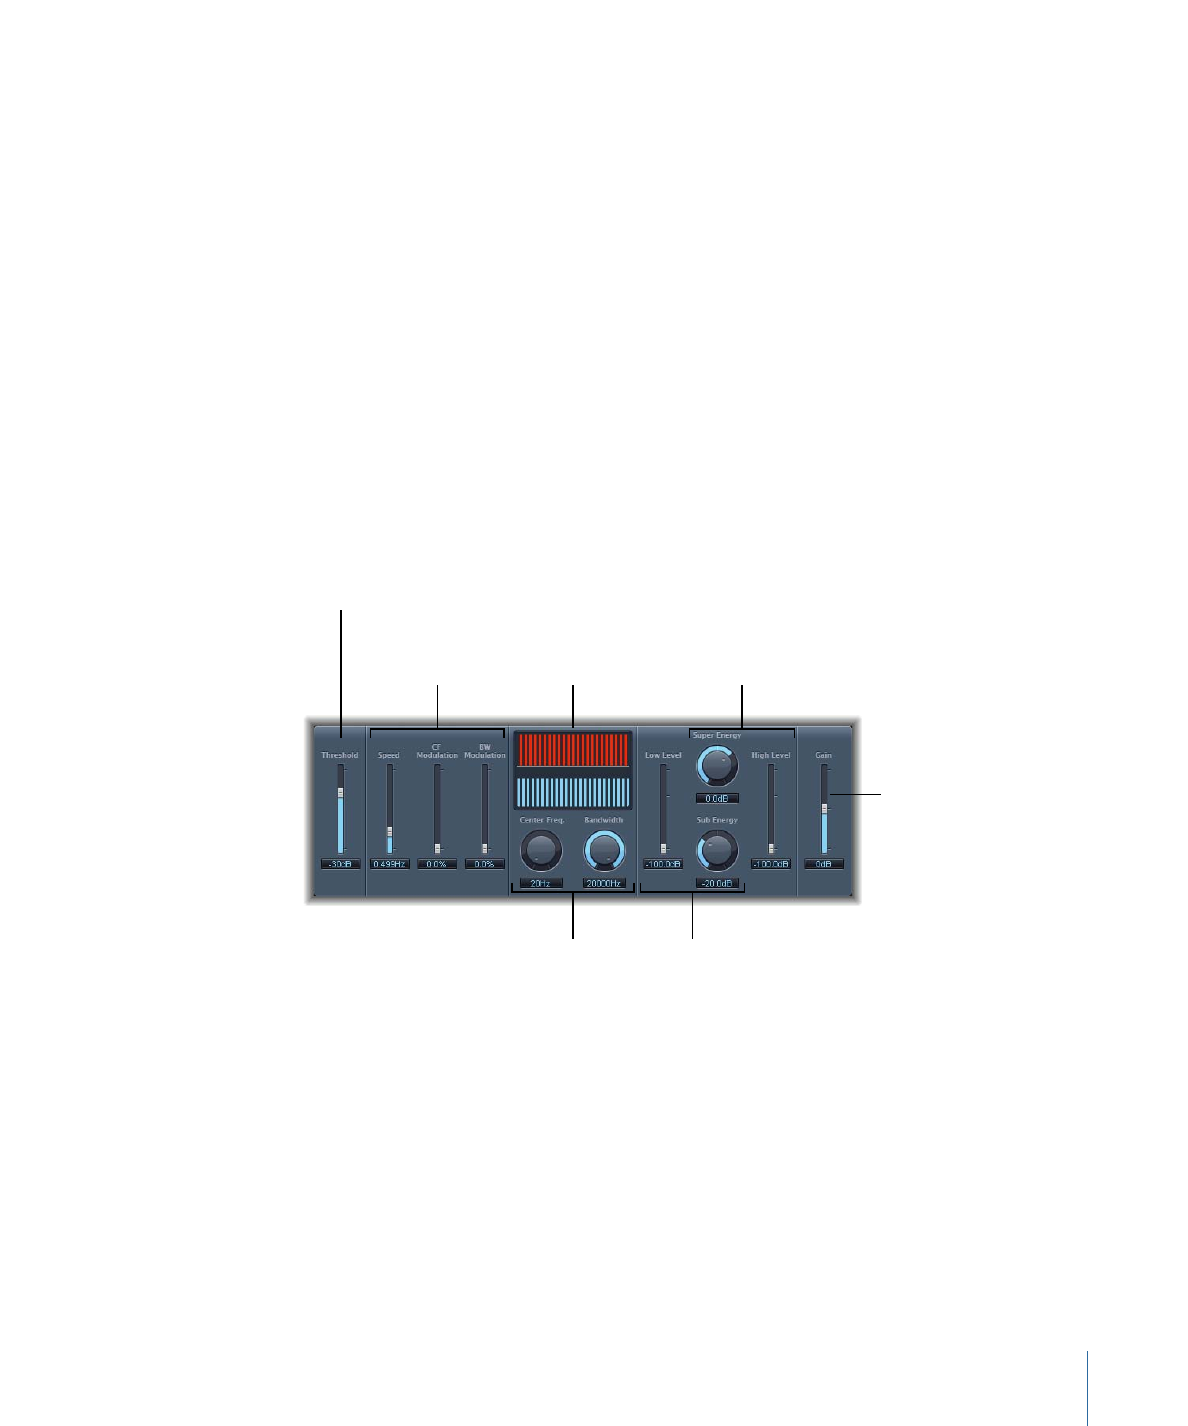
Spectral Gate
The Spectral Gate is an unusual filter effect that can be used as a tool for creative sound
design.
It works by dividing the incoming signal into two frequency ranges—above and below
a central frequency band that you specify with the Center Freq and Bandwidth parameters.
The signal ranges above and below the defined band can be individually processed with
the Low Level and High Level parameters and the Super Energy and Sub Energy
parameters. See
Using the Spectral Gate
.