Tape Delay
Tape Delay simulates the warm sound of vintage tape echo machines, with the
convenience of easy delay time synchronization to your project tempo. The effect is
equipped with a highpass and lowpass filter in the feedback loop, simplifying the creation
of authentic dub echo effects. Tape Delay also includes an LFO for delay time modulation,
which can be used to produce pleasant or unusual chorus effects, even on long delays.
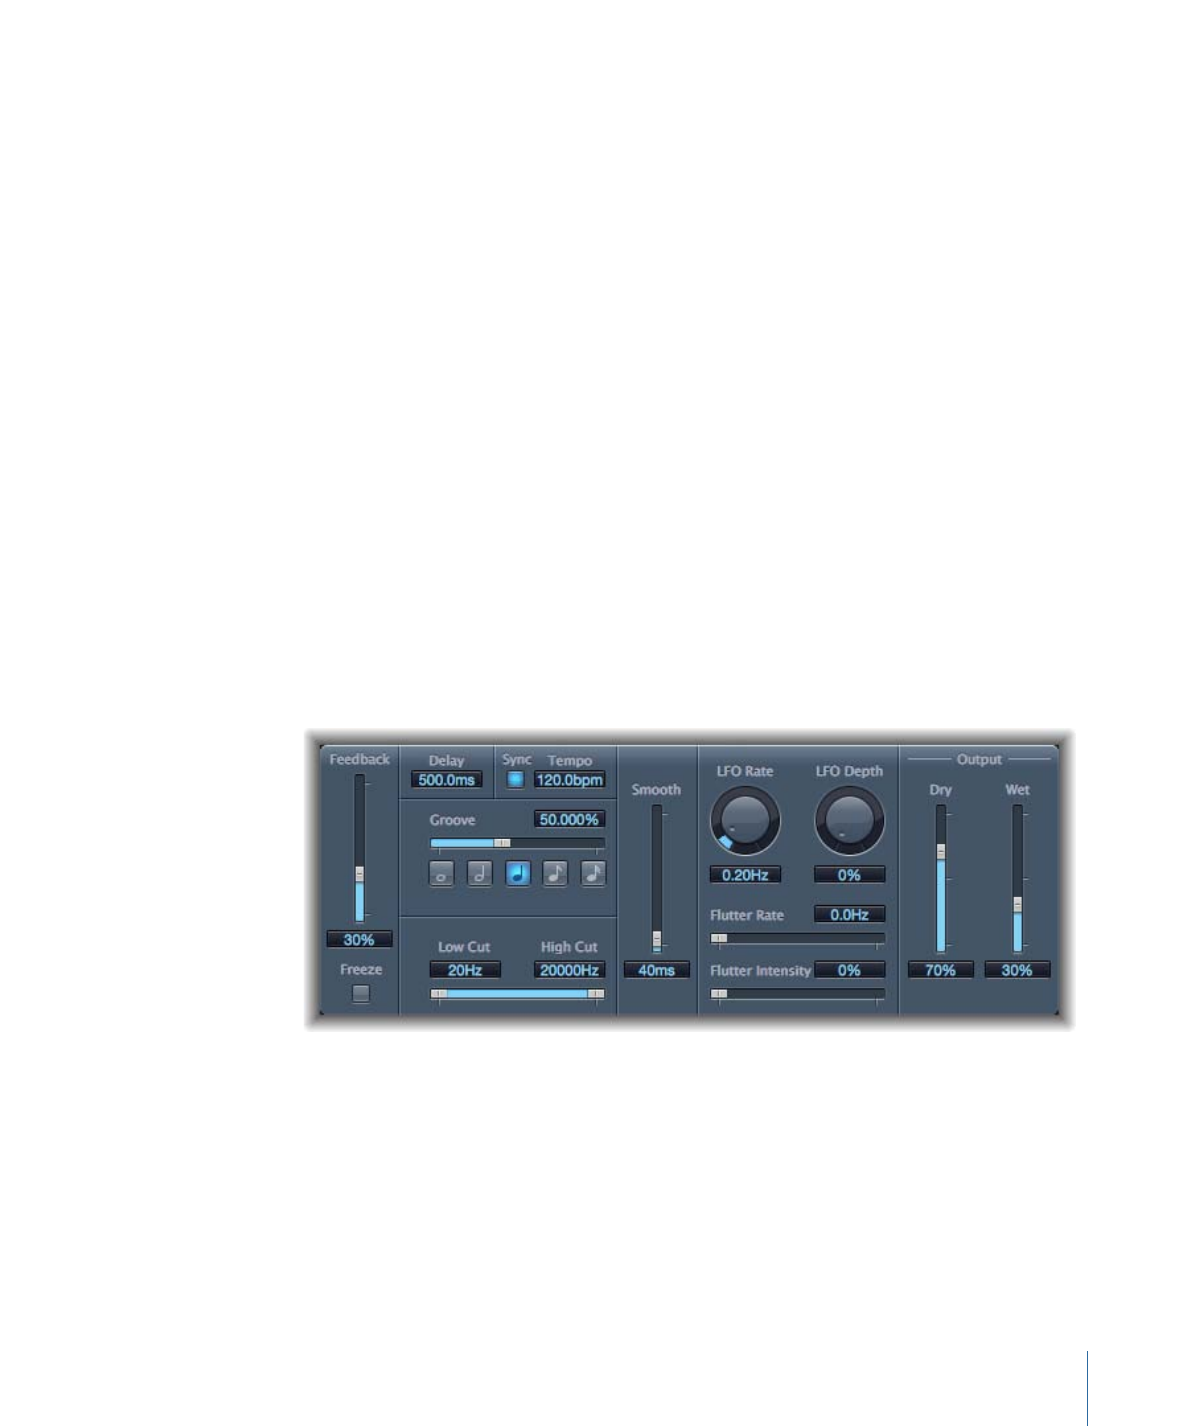
• Feedback slider: Determines the amount of delayed and filtered signal that is routed
back to the input of the Tape Delay. Set the Feedback slider to the lowest possible
value to generate a single echo. Turn Feedback all the way up to endlessly repeat the
signal. The levels of the original signal and its taps (echo repeats) tend to accumulate,
and may cause distortion. You can use the internal tape saturation circuit to ensure
that these overdriven signals continue to sound good.
• Freeze button: Captures the current delay repeats and sustains them until the Freeze
button is turned off.
45
Chapter 2
Echo Effects

• Delay field: Sets the current delay time in milliseconds (this parameter is dimmed when
you synchronize the delay time to the project tempo).
• Sync button: Synchronizes delay repeats to the project tempo (including tempo changes).
• Tempo field: Sets the current delay time in beats per minute (this parameter is dimmed
when you synchronize the delay time to the project tempo).
• Groove slider and field: Determines the proximity of every second delay repeat to the
absolute grid position—in other words, how close every second delay repeat is. A
Groove setting of 50% means that every delay has the same delay time. Settings below
50% result in every second delay being played earlier in time. Settings above 50% result
in every second delay being played later in time. When you want to create dotted note
values, move the Groove slider all the way to the right (to 75%). For triplets, select the
33.33% setting.
• Note buttons: Set the grid resolution for the delay time. These are shown as note
durations.
• Low Cut and High Cut sliders and fields: Frequencies below the Low Cut value and above
the High Cut value are filtered out of the source signal. You can shape the sound of
the echoes with the highpass and lowpass filters. The filters are located in the feedback
circuit, which means that the filtering effect increases in intensity with each delay
repeat. If you want an increasingly muddy and confused tone, move the High Cut slider
towards the left. For ever thinner echoes, move the Low Cut slider towards the right.
If you’re unable to hear the effect even though you seem to have a suitable
configuration, be sure to check out both the Dry and Wet controls and the filter
settings—move the High Cut slider to the far right, and the Low Cut slider to the far
left.
• Smooth slider and field: Evens out the LFO and flutter effect.
• LFO Rate knob and field: Sets the frequency of the LFO.
• LFO Depth knob and field: Sets the amount of LFO modulation. A value of 0 turns delay
modulation off.
• Flutter Rate and Intensity sliders and fields: Simulate the speed irregularities of the tape
transports used in analog tape delay units.
• Flutter Rate: Sets the speed variation.
• Flutter Intensity: Determines how pronounced the effect is.
• Dry and Wet sliders and fields: Independently control the amount of original and effect
signal.
• Distortion Level slider and field (Extended Parameters area): Determines the level of the
distorted (tape saturation) signal.
46
Chapter 2
Echo Effects

An equalizer (commonly abbreviated as EQ) shapes the sound of incoming audio by
changing the level of specific frequency bands.
Equalization is one of the most commonly used audio processes, both for music projects
and in post-production work for video. You can use EQ to subtly or significantly shape
the sound of an audio file, instrument, or project by adjusting specific frequencies or
frequency ranges.
All EQs are specialized filters that allow certain frequencies to pass through unchanged
while raising (boosting) or lowering (cutting) the level of other frequencies. Some EQs
can be used in a “broad-brush” fashion, to boost or cut a large range of frequencies. Other
EQs, particularly parametric and multiband EQs, can be used for more precise control.
The simplest types of EQs are single-band EQs, which include low cut and high cut,
lowpass and highpass, shelving, and parametric EQs.
Multiband EQs (such as the Channel EQ, Fat EQ, or Linear Phase EQ) combine several
filters in one unit, enabling you to control a large part of the frequency spectrum.
Multiband EQs allow you to independently set the frequency, bandwidth, and Q factor
of each frequency spectrum band. This provides extensive, and precise, tone-shaping on
any audio source, be it an individual audio signal or an overall mix.
Final Cut Pro includes a variety of single band and multiband EQs.
This chapter covers the following:
•
AutoFilter
(p. 47)
•
Channel EQ
(p. 53)
•
Fat EQ
(p. 56)
•
Linear Phase EQ
(p. 57)
AutoFilter
The AutoFilter is a versatile filter effect with several unique features. You can use it to
create classic, analog-style synthesizer effects, or as a tool for creative sound design.
47